Thursday, August 12, 2010
School Supply Savings
Last year, Ben started at one school and ended up at another school. By the time we made the decision to switch him back to the original school over the summer, it was too late to buy the prepackaged school supplies. Turns out, I saved A LOT by doing it myself. Buying them from the PTA costs $54.00. I spent a total of $15.53 -- a savings of 73%!! And, I have extra pens, dry erase markers, hand sanitizer, scissors and tissue to contribute to the classroom. I think I'll definitely be doing it myself from now on. It may take a little more time, but if you think of it in terms of Ben's school career + Nick's school career, it's a potential savings of about $1000. And, it still takes time/aggravation to try and park/fight the crowds at school on supply pick up day. Ugh.
Monday, August 2, 2010
Decorating Project
So, I took the picture from the catalog, the tiles, some white paint and an old t-shirt and headed up to my sewing room,
I grabbed the t-shirt, stuck it in the paint and sort of dabbed it against itself to spread around the paint. then, I put it on in a circular motion (wax on, wax off). It dried pretty quickly, then I hung up three of them above the bed and one in the bathroom (not shown). What do you think?
Saturday, July 31, 2010
Wednesday, July 28, 2010
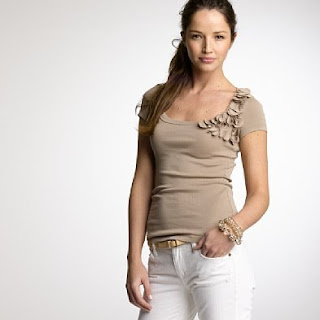
Flower Corsage T-Shirt
And, I was thinking it'd be pretty easy to do this myself. So, I Googled it and found a simple tutorial here. So, last night I pulled out a plain, v-neck t-shirt and went to the sewing room. I decided to start with a circle shape (they show hearts in the tutorial - I'll be doing that next). I just found a roll of tape, traced the center onto card stock and made a template:
Next, I looked to my wall of old t-shirts that I have for my other projects and picked a color:
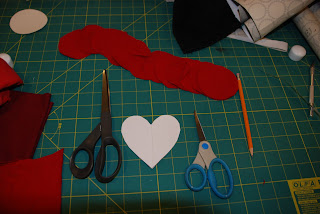
I found it was easiest to cut the template while holding a square of fabric in my hand. At first, I cut two at a time (per the tutorial), but found my scissors could handle 6 layers. Much faster when you need 16!
The last pic shows the heart template for the next round. And, the paper scissors vs fabric scissors. NEVER use fabric scissors on paper! Okay, on to the sewing machine...
 |
| T-shirt before |
I just kept placing circles randomly and adding a few stitches to the center of each and voila! Before too long, I had a new shirt.
The End!
Wednesday, June 30, 2010
Thursday, June 17, 2010
Savings update....
And, here's what I got at CVS for $15 (total savings of 83%):
The other is Money Saving Mom. She posts deals all day long.
If you want to try the Grocery Game, send me a note and I'll send you a referral for a free trial.
Tuesday, June 15, 2010
On The Cheap
My super adorable fellow blogger and friend, Lauren, posted these ah-maaaaa-zing pieces a few weeks back:
Monday, June 14, 2010
Watermelon Rocket Popsicles
First, Nick (no longer so sadly bald, thank GOD) helped chop up all the melon:
Then, I made some simple syrup.
I didn't photograph it, but we squeezed some fresh lime juice, too. Next step - puree in the food processor. BIG FUN for Nick to pulse the melon in there:
Add some simple syrup and lime juice until you like the taste:
Pour in the molds (we have cool rocket ships) and freeze (Ben got involved at this point):
Delicious. Seriously. The boys LOVED them:
Since then, we've made two more rounds. We just use whatever fruit looks like it's about to go bad. I think the tastiest so far were the "cutie" oranges where we squeezed out all the juice and made them the top layer, then pureed strawberries for the bottom layer. The kids go just as crazy for these as they do for sugary popsicles and really, it's straight fruit with maybe a hint of sugar. Not too bad! You can also make the simple syrup with raw sugar. It makes the syrup brown, but it seems to just blend in with whatever fruit you blend up.
Wednesday, June 9, 2010
Loving, Not Loving
 | ||
| image via The Sartorialist |
 | |||
| image via Second Skin |
 |
| image via The Sartorialist |
 |
| image via 9 to 5 Chic |
 |
| image via What I Wore |
 |
| image via Second Skin |
 |
| image via adored austin |
 |
| image via What I Wore |
 |
| image via Second Skin |
Tuesday, June 8, 2010
What the ?
While we're on this subject, how disturbing is Hansel and Gretel and why do parents read it to young children?? Why does it seem like a good idea to read a story to a young child at bedtime about parents abandoning their children in the woods at night only to be taken in by a witch that wants to eat them??
Tuesday, May 25, 2010
How To Save $1362 This Year
- Sign up for your bank's debit card that earns points to redeem online for gift cards for pretty much anything you can think of - gas, Target, Starbucks, etc. My bank charges a $25 annual fee for this card, but we quickly make that money back by using the debit card for nearly every purchase we make. In addition to the things where you pay with a credit/debit card like groceries, gas, doctor visits, etc., I set up automatic payments for cable, car insurance, cell phone, utility bill, gym membership and pest control. Estimated savings this year: $400
- I went to add a line for Husband to the cell phone account and the rep asked me where I work. Thinking that he was just making conversation, I told him. Apparently, I get an 11% discount for that. Estimated savings this year: $112
- I calculated how much we've been spending on groceries and, I feel pretty confident that I can easily cut the budget by 10% simply by paying attention and making a meal plan. In fact, I want to try to save 20% (I'll have to let you know how that goes) by adding in coupons, some stockpiling, etc. as outline in articles like these: http://moneysavingmom.com/31-days-to-a-better-budget-series. Estimated savings this year if cut by 10%: $850
Monday, May 17, 2010
Living Room Window Project
After researching remote-controlled blinds (because they’re way too high to reach) and various sunshades, I knew we had to come up with something a bit more affordable yet not unattractive. I remembered seeing something on a home improvement show awhile back about an ugly skylight. The owners made a wooden frame, covered it in sheer fabric, and wedged it into the space that housed the skylight and it looked a LOT better. So, I sent Husband to the hardware store for some pine 1X2's and he constructed these beauties:
Meanwhile, I went to the local fabric store and bought some cheap muslin. That, along with a staple gun, an iron and some fabric scissors is all you need to make this project your very own:
First, I spread some towels on the dining room table and smoothed out the fabric with an iron:
Then, I started stretching and stapling like crazy:
The trick is to put in all of the staples at an angle so the fabric doesn't pull out, put one in every inch or so so it won't pucker and once you staple on one side, pull the crap out of the fabric on the opposite side to staple.
Trim off excess fabric and voila:
Price breakdown
Wood: $15
Fabric: $14
Total Cost: $29


